Step-by-Step Masterclass: How to Make Custom Hat Patches Like a Pro
A patch maker can recall their first custom patch sale, which featured a pet’s name on a trucker hat. This product was featured in their first tiny online shop with zero knowledge of patch making. After filling their watch history with several tutorials and experimenting with the materials to design something new, they succeeded. A design that their customers proudly wore. This was the win that sparked a passion for patch design.
Today, custom patches are not just a pro. Whether you are designing it to gift your loved one, promote a brand, or boost a business, creating unique ones is easy. This blog will help you answer the question, how?
Understanding What Makes a Great Hat Patch
Before you dive into the making of the patch, it is essential to understand what separates an average patch from a great one. The eye-catching patches are clean, durable, and stitched with all the details. They can stand out not just due to the quality of the thread, but also because it is well-designed onto the fabric. The shape chosen, its finish, and the backing material all contribute to the final results. Regardless of the method you select, whether iron-on, sew-on, or stick-on, each has its importance.
Design Your Custom Hat Patch Today
Choosing the Right Fabric and Backing
Patch-making begins with selecting the ideal base fabric. One of the best options for beginners is using twill fabric. It is strong, smooth, and holds stitches well. Other options to experiment with include felt, canvas, or denim, depending on your design and style. Thicker ones will offer a bold look, while lighter ones are best for delicate embroidery.
Backing is equally essential. If you need to create iron-on patches, you must use a heat-activated adhesive backing. Similarly, sew-on patches require plain felt with a stabilizer. A peel-and-stick support is excellent for casual use, but it is not durable for long-term use. For the right fabric choice and backing option, consider a service like Best Patches Design Company. They can better guide you to lead the process from the initial stage.
Lead The Design Phase Like An Expert
A design can make or break your patch. Simple ones with bold lines and limited colors are the best ones for beginners. There are different software programs available that can help create scalable vector designs. Additionally, when using the embroidery machine, you need to convert it into a digital format.

This sizing chart is based on best-selling patches from 200 U.S.-based Etsy shops in 2025.
Set Up The Workspace
Being a designer, it is not a hard and fast rule that you need a huge studio to begin the process. A small desk with proper lighting and some basic tools is enough. If you have taken a manual start, you will need an embroidery hoop, needle, stabilizer, and thread. For a more professional look and faster results, a home embroidery machine will be your best investment.
The most popular starter machine for patch makers in 2025 has been the Brother SE2000, which combines affordability with digital precision. According to a recent seller poll, it reduced stitching time by 45% compared to hand-stitching.
Digitizing Your Design for Embroidery
Digitizing is the process of turning your patch design into a file your embroidery machine can understand. This step includes defining stitch types, angles, and color changes. There are various software programs available for this task, or you can hire a freelancer to complete it.
Once the file is digitized, run a test on scrap fabric to adjust the thread tension, density, and alignment of the stitch on the actual patch material.
Stitching Your Patch
Now comes the exciting part: bringing your design to life. Hoop your patch fabric along with a stabilizer and start the embroidery. Watch closely during the process, especially if it’s your first run. Pause if needed to cut excess threads or adjust tension. Once done, remove the hoop and trim the patch edges cleanly using sharp scissors or a laser cutter for precise finishing. You can take help from services like Custom Hat Patches in UK. The expert team working in the company can provide you with better insight into the design process.
If your design includes the iron-on backing, it is time to attach the heat adhesive to the back. This can be done through using a heat press or a home iron. For the sew-on, keep the back plain and add an extra layer for added strength.
Attaching the Patch to Your Hat
There are several ways to apply your finished patch to a hat. Iron-on ones will need a heat press. Simply align the patch on the front panel of the hat and press it firmly for a few seconds. Allow it to cool down. For the sew-on, you can use a curved needle and a strong thread to secure the patch to the edges. Or you can use the glue for the application and press it firmly for 24 hours.
Scaling Up for Small Business
After mastering the basics, scaling becomes much easier. You can offer patch customization, experiment with using glow-in-the-dark thread, or explore 3D puff embroidery. You can even create patch bundles or seasonal collections. There are various social platforms where surveys indicate that hats are sold for between $8 and $20, depending on the design.

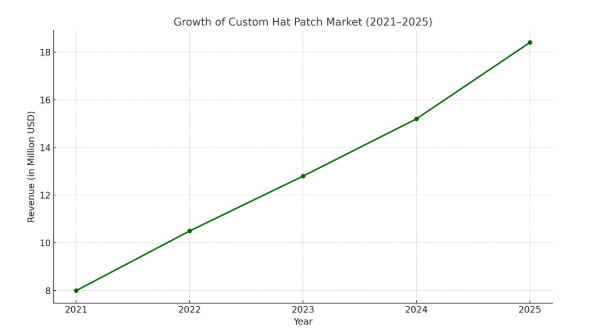
The line graph clearly shows the rising interest and opportunity in this handmade niche.
The Final Comment
Creating a custom patch for hats is a skill that develops with practice, patience, and the right tools. Whether you are a creative head who is looking for the means to start a small business offering unique styles, patch-making must be your edge. The start will always be with a single, messy experiment, but it will improve with time and practice.
The journey begins with uneven stitches or crooked edges, but soon you will be creating patches people will be proud to wear. In a world where handmade elements are essential, your story and stitch both have a unique place.
